Setup environment for PhoneGap android with eclipse in Windows 7/8
1) Download
a) JAVA from http://www.oracle.com/technetwork/java/javase/downloads/index.html
b) APACHE ANT from http://ant.apache.org/bindownload.cgi (under Current Release of Ant)
c) ANDROID SDK from https://developer.android.com/sdk/index.html#ExistingIDE
* This will contain
* Eclipse + ADT Plugin
* Android SDK Tools
* Android Platform-tools
* The latest Android platform
* The latest Android system image for the emulator
d) If you want new version of Eclipse you can download from https://www.eclipse.org/downloads/
2) Install all Software.
3) Now we will Set up environment variables
* Follow the bellow images
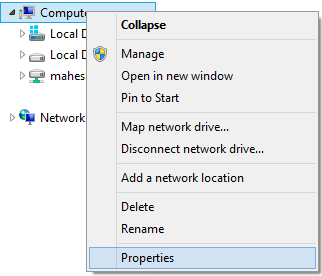


Under User variables for {YOUR NAME}
JAVA_HOME C:\Program Files\Java\jdk1.7.0_51\
Under System variables
ANDROID_HOME E:\Downloads\adt-bundle-windows-x86_64-20131030\sdk
(This is my source path)
ANT_HOME C:\apache-ant-1.9.3 (This is my source path)
PATH {Here already have some variables along with we need add these};C:\Program Files\Java\jdk1.7.0_51\bin;C:\Program Files\Java\jre7\bin;C:\Program Files (x86)\Java\jre7\bin;%ANT_HOME%\bin;
If you are using 64 bit OS then look for java in C:\Program Files (x86)\Java\ and C:\Program Files\Java\
After set up env variables check for is java and apache ant are working fine
Open command prompt and type bellow command
C:\> java
here you can see all parameters.
C:\>ant
Buildfile: build.xml does not exist!
Build failed
Don't worry Apache Ant set successfully
5) Now install ADT Plugin in eclipse (If you installed eclipse as per (d), other wise check the installed software's in eclipse )


Download the ADT Plugin
Start Eclipse, then select Help > Install New Software.
Click Add, in the top-right corner.
In the Add Repository dialog that appears, enter "ADT Plugin" for the Name and the following URL for the Location:
https://dl-ssl.google.com/android/eclipse/
Click OK.
If you have trouble acquiring the Plugin, try using "http" in the Location URL, instead of "https"
(https is preferred for security reasons).
In the Available Software dialog, select the checkbox next to Developer Tools and click Next.
In the next window, you'll see a list of the tools to be downloaded. Click Next.
Read and accept the license agreements, then click Finish.
If you get a security warning saying that the authenticity or validity of the software can't be
established, click OK.
When the installation completes, restart Eclipse.
For more information fallow this URL http://developer.android.com/sdk/installing/installing-adt.html
6) Close and open Eclipse
Now you will prompt with an alert box to set the Android SDK path. Set that
7) Download phonegap from http://phonegap.com/install/
You can use npm install if you already installed Node.js in your system. Other wise download latest zip file
8) Now create new android project
a) Follow these images


b) Now go to phonegap folder {phonegap-2.9.0\lib\android\example\assets\} copy www folder and paste it in your current android project asstes folder
c) The same for cordova jar file {phonegap-2.9.0\lib\android\example\libs\}
d) config xml file from {phonegap-2.9.0\lib\android\example\res} copy xml folder and paste in res folder of your application
9) Now click F5 in eclipse.
10) Now follow these images to Buildpath/configure jar files


Click on Add JARs

Select Cordova jar file from and click OK button.
11) Now open MianActivity.java file from src/ folder and do changes

a) This is before change (Do these changes.)
package com.mahesh.myfirstphonegapapp;
import android.os.Bundle;
import android.app.Activity;
import android.view.Menu;
public class MainActivity extends Activity {
@Override
protected void onCreate(Bundle savedInstanceState) {
super.onCreate(savedInstanceState);
setContentView(R.layout.activity_main);
}
@Override
public boolean onCreateOptionsMenu(Menu menu) {
// Inflate the menu; this adds items to the action bar if it is present.
getMenuInflater().inflate(R.menu.main, menu);
return true;
}
}
b) This code after change (The bold and highlighted code is the changes)
package com.mahesh.myfirstphonegapapp;
import org.apache.cordova.*;
import android.os.Bundle;
import android.view.Menu;
public class MainActivity extends DroidGap {
@Override
public void onCreate(Bundle savedInstanceState) {
super.onCreate(savedInstanceState);
super.loadUrl("file:///android_asset/www/index.html");
}
@Override
public boolean onCreateOptionsMenu(Menu menu) {
// Inflate the menu; this adds items to the action bar if it is present.
getMenuInflater().inflate(R.menu.main, menu);
return true;
}
}
12) Now run the project as shown bellow image

13) If you already setup emulator you can use that other wise create one emulator and use it,
OR if you want to test directly from your mobile phone, then connect your phone with data cable
and check the optin for usb debugging and install from 3rd pary software options in your phone.
a) JAVA from http://www.oracle.com/technetwork/java/javase/downloads/index.html
b) APACHE ANT from http://ant.apache.org/bindownload.cgi (under Current Release of Ant)
c) ANDROID SDK from https://developer.android.com/sdk/index.html#ExistingIDE
* This will contain
* Eclipse + ADT Plugin
* Android SDK Tools
* Android Platform-tools
* The latest Android platform
* The latest Android system image for the emulator
d) If you want new version of Eclipse you can download from https://www.eclipse.org/downloads/
2) Install all Software.
3) Now we will Set up environment variables
* Follow the bellow images
Under User variables for {YOUR NAME}
JAVA_HOME C:\Program Files\Java\jdk1.7.0_51\
Under System variables
ANDROID_HOME E:\Downloads\adt-bundle-windows-x86_64-20131030\sdk
(This is my source path)
ANT_HOME C:\apache-ant-1.9.3 (This is my source path)
PATH {Here already have some variables along with we need add these};C:\Program Files\Java\jdk1.7.0_51\bin;C:\Program Files\Java\jre7\bin;C:\Program Files (x86)\Java\jre7\bin;%ANT_HOME%\bin;
If you are using 64 bit OS then look for java in C:\Program Files (x86)\Java\ and C:\Program Files\Java\
After set up env variables check for is java and apache ant are working fine
Open command prompt and type bellow command
C:\> java
here you can see all parameters.
C:\>ant
Buildfile: build.xml does not exist!
Build failed
Don't worry Apache Ant set successfully
5) Now install ADT Plugin in eclipse (If you installed eclipse as per (d), other wise check the installed software's in eclipse )
Start Eclipse, then select Help > Install New Software.
Click Add, in the top-right corner.
In the Add Repository dialog that appears, enter "ADT Plugin" for the Name and the following URL for the Location:
https://dl-ssl.google.com/android/eclipse/
Click OK.
If you have trouble acquiring the Plugin, try using "http" in the Location URL, instead of "https"
(https is preferred for security reasons).
In the Available Software dialog, select the checkbox next to Developer Tools and click Next.
In the next window, you'll see a list of the tools to be downloaded. Click Next.
Read and accept the license agreements, then click Finish.
If you get a security warning saying that the authenticity or validity of the software can't be
established, click OK.
When the installation completes, restart Eclipse.
For more information fallow this URL http://developer.android.com/sdk/installing/installing-adt.html
6) Close and open Eclipse
Now you will prompt with an alert box to set the Android SDK path. Set that
7) Download phonegap from http://phonegap.com/install/
You can use npm install if you already installed Node.js in your system. Other wise download latest zip file
8) Now create new android project
a) Follow these images
Click on New->Project->Select Android->new
The above will be the project strtucture.
b) Now go to phonegap folder {phonegap-2.9.0\lib\android\example\assets\} copy www folder and paste it in your current android project asstes folder
c) The same for cordova jar file {phonegap-2.9.0\lib\android\example\libs\}
d) config xml file from {phonegap-2.9.0\lib\android\example\res} copy xml folder and paste in res folder of your application
9) Now click F5 in eclipse.
10) Now follow these images to Buildpath/configure jar files
Click on Add JARs
Select Cordova jar file from and click OK button.
11) Now open MianActivity.java file from src/ folder and do changes
a) This is before change (Do these changes.)
package com.mahesh.myfirstphonegapapp;
import android.os.Bundle;
import android.view.Menu;
@Override
protected void onCreate(Bundle savedInstanceState) {
super.onCreate(savedInstanceState);
}
@Override
public boolean onCreateOptionsMenu(Menu menu) {
// Inflate the menu; this adds items to the action bar if it is present.
getMenuInflater().inflate(R.menu.main, menu);
return true;
}
}
b) This code after change (The bold and highlighted code is the changes)
package com.mahesh.myfirstphonegapapp;
import org.apache.cordova.*;
import android.os.Bundle;
import android.view.Menu;
public class MainActivity extends DroidGap {
@Override
public void onCreate(Bundle savedInstanceState) {
super.onCreate(savedInstanceState);
super.loadUrl("file:///android_asset/www/index.html");
}
@Override
public boolean onCreateOptionsMenu(Menu menu) {
// Inflate the menu; this adds items to the action bar if it is present.
getMenuInflater().inflate(R.menu.main, menu);
return true;
}
}
12) Now run the project as shown bellow image
13) If you already setup emulator you can use that other wise create one emulator and use it,
OR if you want to test directly from your mobile phone, then connect your phone with data cable
and check the optin for usb debugging and install from 3rd pary software options in your phone.
Comments
Post a Comment