Create Virtual Host in IIS Server
1) Open Command Prompt using Administrative Rights
2) Flush the cache of ARP (Address resolution protocol)
a) C:\Windows\system32>netsh interface ip delete arpcache
b) C:\Windows\system32>arp -a
3) Open IE (Internet Explorer)
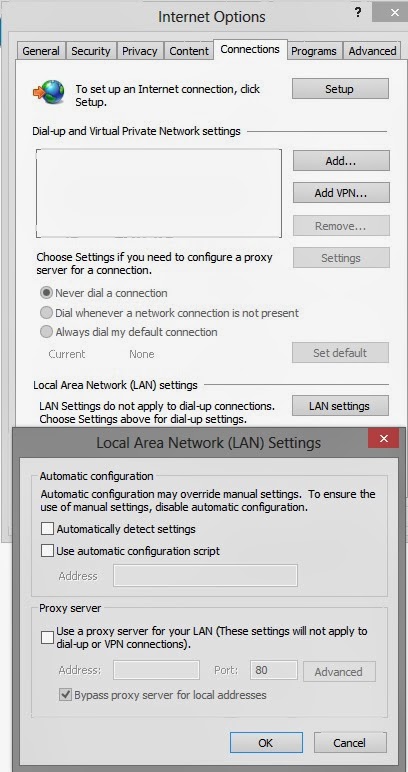
a) Open Internet Options window from settings
b) Click on Connections Tab -> Click on LAN Settings button
c) Uncheck all checkbox but make sure to check the "Bypass proxy server for local address."
4) Open Hosts file from C:\Windows\System32\drivers\etc Folder (Make sure is it have write permission)
It will look like this
# localhost name resolution is handled within DNS itself.
# 127.0.0.1 localhost
# ::1 localhost
Add these lines at bottom of this file (You can add multiple names)
127.0.0.1 mysite.com
127.0.0.1 maheshbokkisam.com
5) Now check is these virtual host/domain names are working
a) Go to Command Prompt and run this commands
5.a.1) ping mysite.com (check is this pinging to 127.0.0.1 or not)
5.a.2) tracert mysite.com (check is mysite.com is tracing to 127.0.0.1)
6) Now open IE (Internet Explorer) OR any browser
type in address bar for first time like http://mysite.com:80
It will show default localhost files (C:\inetpub\wwwroot)
7) Now Create folder in any Driver
8) Open IIS Manager
a) Click on Add Website from Connections
b) add sitename as mysite.com(your custom domain name)
c) Select your Physical Path (You can select existed one or you can create New Folder)
d) Open Bindings from Actions and check is you domain is present, if not then add

9) Now Restart your IIS server OR your domain
10) Open browser and access you virtual host (domain name)
NOTE:
If the virtual host/website is not working in IE and is working in Firefox browser, then do these changes
1) Fix it by adding the necessary URLs to the list of “Local intranet” sites in Internet Explorer.
2) Go to
“Internet Options”, under the “Security” tab,
select “Local intranet”,
and then click the “Sites” button near the top.
3) In the window that opens,
click the “Advanced” button, and
add websites to this zone,
and then they seem to work locally.
4) This might be a simpler option for someone who only needs to access a few URLs locally.
2) Flush the cache of ARP (Address resolution protocol)
a) C:\Windows\system32>netsh interface ip delete arpcache
b) C:\Windows\system32>arp -a
3) Open IE (Internet Explorer)
a) Open Internet Options window from settings
b) Click on Connections Tab -> Click on LAN Settings button
c) Uncheck all checkbox but make sure to check the "Bypass proxy server for local address."
4) Open Hosts file from C:\Windows\System32\drivers\etc Folder (Make sure is it have write permission)
It will look like this
# localhost name resolution is handled within DNS itself.
# 127.0.0.1 localhost
# ::1 localhost
Add these lines at bottom of this file (You can add multiple names)
127.0.0.1 mysite.com
127.0.0.1 maheshbokkisam.com
5) Now check is these virtual host/domain names are working
a) Go to Command Prompt and run this commands
5.a.1) ping mysite.com (check is this pinging to 127.0.0.1 or not)
5.a.2) tracert mysite.com (check is mysite.com is tracing to 127.0.0.1)
6) Now open IE (Internet Explorer) OR any browser
type in address bar for first time like http://mysite.com:80
It will show default localhost files (C:\inetpub\wwwroot)
7) Now Create folder in any Driver
8) Open IIS Manager
a) Click on Add Website from Connections
b) add sitename as mysite.com(your custom domain name)
c) Select your Physical Path (You can select existed one or you can create New Folder)
d) Open Bindings from Actions and check is you domain is present, if not then add
9) Now Restart your IIS server OR your domain
10) Open browser and access you virtual host (domain name)
NOTE:
If the virtual host/website is not working in IE and is working in Firefox browser, then do these changes
1) Fix it by adding the necessary URLs to the list of “Local intranet” sites in Internet Explorer.
2) Go to
“Internet Options”, under the “Security” tab,
select “Local intranet”,
and then click the “Sites” button near the top.
3) In the window that opens,
click the “Advanced” button, and
add websites to this zone,
and then they seem to work locally.
4) This might be a simpler option for someone who only needs to access a few URLs locally.
Comments
Post a Comment